Few Homemade Non-Toxic Cleaners to help with all your Household Cleaning (Part 3)

Most of the commercially available cleaners that are available in the stores contain harsh chemicals that contain some downright harmful chemicals that include skin and respiratory irritants and ecological contaminants.

These so called cleaners might be cleaning our space up but in the long run they are practically killing us like slow poison.

And worse, there store bought cleaners are really EXPENSIVE!

Thus, as a step towards a healthy lifestyle and as an effort to save the planet we are here to provide you with a series of blogs each containing FIVE efficient and easy ways to make your very own homemade Cleaners that will not only aid in the cleaning process but also save you countless bucks during the process.

So without further adieu, let’s commence with the cleaning!


  1. Homemade Bathtub Cleaner

Cleaning Bathtubs is hard work as it is let alone having to clean it almost every week. Well not to worry anymore. We are here to the rescue!

Ingredients

  • 3 dozen eggshells to make about 3/4 cup of calcium powder
  • 1/2 cup baking soda
  • 15-20 drops of your favourite pure essential oil – I recommend something citrus-y

Procedure

  • Rinse the eggshells well with plain tap water.
  • Meanwhile, place 3-4 gallons of water in a large stockpot and bring to a boil. Reduce heat to a gentle simmer, then carefully lower the eggshells into the water and let them cook for 10-12 minutes.
  • Remove the shells carefully and set them upside down on a baking sheet. Let them air dry for 8-12 hours, then place them in a 200° degree oven until they are completely bone dry, about 10 minutes.
  • Working in batches, place the shells in a coffee grinder and process until they are completely powdered.
  • Toss the finished calcium powder with the baking soda and essential oils and mix until the oils are well-distributed and no clumps exist.
  • Spoon into a pint-sized Mason jar, then lay a piece of plastic wire mesh over the mouth. Screw on the regular lid to fit very tightly and store in a cool, dark place. To use, merely remove the lid and rescrew on the ring to create a shaker. (You could also use a sprouting lid or anything else that strikes your fancy!)
  1. Frozen Citrus-Rosemary Garbage-Disposal Cleaning Cubes

The next time you’re enjoying an orange, hold onto the peels for this easy cleaning DIY. When your sink is wafting a bit of an unsavoury smell, you can quickly clean it with the help of that orange rind and some rosemary. And using vinegar naturally cleans your disposal. The little eco-cleaners basically cost nothing to make and put the rinds of your oranges, lemons, or limes to good use.

Ingredients

  • 1/2 cup citrus rinds
  • 2 tablespoons fresh or dried rosemary
  • Ice cube tray
  • Vinegar

Procedure

  1. Chop the citrus rinds along with the rosemary into a rough dice. You can use lemon, orange, or lime rinds for this DIY. Citrus peels are filled with natural antibacterial oils and also smell amazing. Rosemary is also naturally antibacterial and antifungal, making it a smart addition to this DIY. You can use fresh or dried, whichever you have on hand.
  2. Sprinkle the ice cube tray with the mixture, evenly distributing the peels and rosemary. Now fill with the vinegar, which is also a natural cleaner that refreshes dark and damp spaces. Place in the freezer until the cubes are frozen solid.
  3. Pop the cubes out of the tray, and place them in a glass jar or bowl in your freezer. The next time your garbage disposal isn’t smelling so great, toss one down the drain, turn on your disposal with water running, and enjoy the fresh scent! Extra bonus? The frozen cube also sharpens your disposal’s blades.
  1. DIY car upholstery cleaner

Mix together this quick and easy upholstery cleaner that you can stash in your car to use when needed. Made with your favorite dish soap and clean-boosting Borax, your seats will always look wonderfully fresh.

Ingredients

  • 3 tablespoons dish soap
  • 1 tablespoon Borax
  • 1 cup boiling water
  • Small mixing bowl
  • Funnel (optional)
  • Small spray bottle

Proedure

  1. Mix together the dish soap and Borax in a small bowl, and then cover with boiling water, stirring to distribute. Dish soap breaks up tough stains, and Borax is a natural cleaning booster that helps refresh and disinfect.
  2. Let the cleaner cool, and then pour it into a small spray bottle, using a funnel as needed. Do a quick spot check before using to make sure the cleaner doesn’t discolor your car seat fabric.
  3. The next time you’re dealing with a spill, spritz the cleaner onto a paper towel or soft cloth, and dab it onto the stain. Or use it full force with this complete car seat cleaning method!
  1. All natural upholstery cleaner

Let me just tell you that I have personally used this several times and the results were pure perfection every single time.

Ingredients

  • 2/3 cup of baking soda
  • 1/4 cup of white vinegar
  • 5 cups of warm water
  • 6 drops of lavender essential oil

Procedure

  1. Combine 2/3 cup of baking soda with 1/4 cup of white vinegar.
  2. Then add 5 cups of warm water and 6 drops of lavender essential oil.
  3. Stir until the baking soda dissolved.
  4. Pour it into a spray bottle.
  1. Homemade leather cleaner

Along with cleaning and organizing your home, keeping your leather furniture in great shape is a must once the weather starts getting warmer. Fresh spring air and hot summer sun can cause cracks and dryness in your favourite leather furnishings, which doesn’t make for a happy house. Instead of spending money on expensive cleaners and cleansers, make your own with ingredients you have in your kitchen. Free of any chemicals, this eco-friendly cleaner does an awesome job at refreshing all your leather furnishings. And did we mention that it costs basically nothing to make?

Ingredients

  • Paper towels
  • 1/4 cup vinegar
  • 1/4 cup olive oil
  • 10 drops lemon or orange essential oil (optional)
  • Small bowl

Procedure

  1. Start by vacuuming your leather furniture, removing any bits of food and dust lurking about. Then gently wipe the leather item with a damp paper towel.
  1. Mix together the vinegar and olive oil in a small container, whisking to incorporate. The oil and vinegar won’t completely come together because the liquids have different densities. The vinegar gently cleans the leather, and the olive oil breaks up dirt and stains while conditioning the furniture. Adding essential oil gives the cleaner a nice scent, which leaves your furnishings smelling fresh.
  2. Dip a clean paper towel into the homemade cleaner and then gently rub on a small test area of the leather item. Let dry for 20 minutes and check for discoloration before coating furniture. Working in a circular motion, coat the entire piece, rubbing the cleaner into the leather. Use a clean and dry paper towel to gently wipe down the furniture, removing any remaining oil. Now sit back and enjoy your freshly cleaned leather!

So that is it for today folks….

I hope the DIY cleaners up-top help you out on the quest to keeping the planet green and your home toxins free…

And if that doesn’t work out for you, you always have us at Prudent Cleaning Services (London, UK) to help you out.

Stay tuned for more

&

Happy Cleaning…

What should be the part of your Essential Everyday Toolbox?

Whether you’re a rookie handyman or a seasoned do-it-yourselfer, a range of basic tools is essential to doing the small jobs around the house. Pick a place for your cache of tools—a kitchen drawer, maybe, a carton in the hall closet, or even a real toolbox—and make a point of always returning the ones you use to their designated home.

What tools will you need?

Your skills and the kinds of jobs you do must be your guide, but a good basic ce9b980df4c01f8e8ffc86f0581b67fdselection would include a tape measure, square, and torpedo level for measuring and setting.

A handsaw or handheld circular saw, a utility knife, a cordless drill, and maybe a glass cutter will take care of your cutting and drilling tasks.

For fastening, how about a small set of screwdrivers, a staple gun, pairs of electrician’s, waterpump, and locking pliers, and a hammer?

Tape Measure

Few tools translate to so many trades, from dressmaking to dressing stone—the convenient and compact tape measure makes all kinds of jobs possible.

Also called a push-pull tape, the basic tape measure is spring loaded so that the tape retracts into its metal or plastic case when not in use. It comes in all sorts of sizes, from 3-foot key-chain sized rules to bulky 25-foot flexible rules.

Tape measures have blades (as the tapes themselves are officially known) that come in 1/2-inch, 3/4-inch, and 1-inch widths. Wider tapes are bulkier, but also have the advantage of extending farther without the supporting hand of an assistant at the other end. A good size for most around-the-house jobs is a 3/4-inch-wide, 16-foot-long tape measure.

Combination Square

As with any square, the principle job of a combination square is to advise its user when the relationship of two sides of an object is a true 90-degree angle.

The combination square is adjustable, consisting of a rigid steel rule, typically 12 inches long, with a headpiece that slides along its length. The headpiece has both a 90-degree edge and one that forms a 45-degree angle with respect to the rule. It’s ideal for marking (and checking) both 90-degree crosscuts and mitre cuts.

The combination square can be used to determine the squareness of a piece or joint or as a saw guide when using a handheld circular saw. When the head is set at the end of the rule, the combination square can measure heights, and it can be adjusted to measure depths. It’s very handy for marking, and there’s even a bubble level in its handle, enabling the tool to be used for leveling.

Torpedo Level

Usually 9 inches long and tapered at both ends, this handy tool is also known as a canoe or boat-shaped level. Inside the plastic, wood, or metal body of the torpedo level are two or three spirit tubes.

These sealed vials contain water, alcohol, or another clear liquid. Each tube or vial is slightly curved with two parallel lines drawn at its centre. The vial is not quite full, leaving space for an all-important air bubble. The bubble vial has been precisely mounted so that when the bubble is aligned between the hairlines, it indicates that the body of the level, and thus the object being trued, is at true vertical or horizontal, depending upon how the vial in mounted in the level.

Handsaws

Even in this age of power tools, the traditional handsaw has many uses. It’s quiet, portable, easy to use, requires no electrical power, and can finish more than a few jobs the basic hand-held circular saw cannot. It’s also inexpensive and poses little risk to little hands.

The basic handsaw has a blade roughly two feel long that tapers from the heel (at the handle) to its toe. The most common use is simple cut-off work when it’s quicker to grab a handsaw than it is to run an extension cord to do the job with a power saw.

Approach a handsaw as if to shake hands, grabbing its closed wood or plastic handle. The flat blade, typically of steel, will flex from side to side. The teeth may be designed for cutting across the grain (crosscut saws) or for cutting with it (ripsaws). A 10- or 12-tooth crosscut saw of 22 inches is a good basic saw that can also rip a board if necessary.

Electric Drill

This is one versatile tool—it will drill holes, sand and grind, stir paint, and drive screws and good basic electric drills start at a very modest price.

The basic electric drill consists of a motor built into a pistol-shaped body. Instead of a gun barrel, though, there’s a gripping device called a chuck into which one of a wide variety of bits or drill is inserted. Older models lock the bits in place using a key that tightens the chuck, but most new drills use a keyless chuck that requires only the grip of your hand to tighten it. It’s a good innovation that makes changing bits much quicker and easier.

Another recent shift is to cordless drills. The initial cost is significantly is higher, but for the extra money there’s a big jump in convenience. It’s a judgment call, but if the price doesn’t seem prohibitive, the gain in flexibility is probably worth the extra investment.

Claw Hammer

When most people think of a hammer, the image of a claw hammer comes to mind. The head has a face that is used to drive nails, on the opposite side of the head is a two-pronged claw that is used to pull nails out of wood. The head is steel, the handle can be of fiberglass, wood (typically hickory), or steel. Fiberglass and steel hammers usually have rubber, plastic, or vinyl handles for a sure grip and shock absorption.

The claw hammer may be the carpenter’s most essential tool, but not all hammers are the same. They range in size from small tack hammers to huge framing hammers that are 18 inches long and weight almost two pounds. For most people, a good general purpose hammer is moderate in size, weighing perhaps 16 ounces with a 16-inch handle. The heads vary greatly, too, with flattened or curved claws. Chose a smaller hammer for finer work, go larger if you plan to drive large nails.

Screwdrivers

Most screwdrivers share an overall design, consisting of a steel shaft called a shank, a tip called a blade, and a handle. But there are lots of variations in blades and handles, not to mention the oddball screwdrivers that have no shafts at all but instead use ratchets offset at a 90-degree angle to the tip to drive screws in confined spaces.

Most handles are bulb-shaped, large enough to be gripped comfortably in the palm of the hand. Electrician’s screwdrivers usually have plastic handles—the plastic insulates the user from the risk of electric shock. Wooden-handled drivers are more often found in woodshops. Auto mechanics tend to favour drivers that have rubber sleeves on the handles for a firm grip. Drivers can be long or short, ranging from stubbies about 2-1/2 inches long to specialty drivers 2 feet or more.Assembly_Fotor_Collage

C-Clamps and Bar Clamps

The clamp is a simple tool, consisting of a pair of jaws drawn together with a tightening mechanism, typically a screw driver. When working with wood in particular, a clamp is essential for pulling together the pieces to be glued and for holding them tight and flush until the glue sets.

While there are lots of types of clamps, for most around-the-house jobs, C-clamps or bar clamps will do the work. C-clamps have jaws in the shape of the letter C, with metal shoes at the top and bottom to grip the work piece. Bar clamps are usually larger, with a fixed jaw at one end of the bar and another on a tail slide that moves up or down its length. The pressure is exerted by both C-clamps and bar clamps by the screw driver, typically driven by a T bar that forms a handle.

A recent variation on the traditional bar clamp is the quick-grip clamp. These rely on a pistol-squeeze action. Quick-grips don’t have the same clamping power as bar clamps but have cushioned jaws and are easier to use.

Random Orbital Sander

A convenient, one-handed tool, the random orbital sander is driven by an electric motor. The motor spins a shaft on which a counterweight is mounted. The combination of the weight, the spinning shaft, and an offset thrust bearing produces a random, varying motion. Which is to say, it spins and wiggles, never the same way twice, and does a neat job, producing little or no scratching across the grain. The motion also tends to clean the sandpaper, avoiding the clogged surfaces common to straight-line sanders.

The random orbital sander uses prefabricated sandpaper disks, available from coarse to fine, which will remove lots of material quickly or produce a fine finish. Depending upon the manufacturers, the sandpaper is attached with either hook-and-loop (Velcro) or pressure sensitive (adhesive) backings.
Random orbital sanders are sold as single-speed and variable-speed models. Most come with a dust bag attachment, which also reduces the frequency with which the dust clogs the paper and results in a somewhat cleaner work area.

Staple Gun

The staple gun can be used to fasten all kinds of materials in home construction and maintenance work. Roofing contractors, insulation installers, carpenters, and all kinds of homeowners and hobbyists find a multitude of uses for staplers every day.

The staple gun is no more than the larger, tougher sibling of the desk stapler that’s a fixture in every office. The ammunition is bigger, as most guns take staples that are 1/4 inch to 9/16 inch long, the width of the staples varies with the manufacturer.

Staple guns come in hand-powered and electric models. The most common variety is powered by a spring: a large lever built into the handle at the top acts as trigger, and the spring squeezes out a staple when the gun is pressed into the workpiece. Electric models are faster and easier to use, another type, the hammer stapler is swung like a hammer. It’s great for construction jobs but not for delicate ones.

Locking Pliers

These adjustable pliers are useful as a hand-held vice or clamp. They lock firmly onto a work piece, usually one of metal. They are also known as plier wrenches, lever-wrench pliers and by the proprietary name Vice grips.

The key is the double-lever action of the jaws. Like other pliers, the jaws of the locking pliers are closed by squeezing the handles together, unlike water pumps, electrician’s, and other pliers, the jaw opening is adjusted by turning a screw driver in one handle so the jaws will close with a vice-like grip. A trigger on the other handle loosens the grip, which can apply tremendous force.

Locking pliers are sold in several designs (with long nose, flat-jawed, and even C-clamp jaws), but the standard design has serrated, straight jaws. A pair in the eight- to ten-inch long range will have the most uses in the basic toolbox.

Bevel Gauge

Though the bevel gauge is a near relation of the square, its purpose is to help fabricate pieces that are not square.

The tool consists of a handle (or stock) with an attached tongue (or blade). The tongue fits into a groove cut into the head of the stock where it’s fastened with a locking mechanism. Often the tongue is made of thin steel and the stock of wood, plastic, or metal.

To put the tool to use, hold the stock against an edge with the tongue stretched across the work piece. The tongue can then be shifted to assume any angle between zero and 180 degrees. When the bevel gauge is set at the angle you want, use the bolt and wing nut or lever device to set the tool at the desired angle.

Carpenter’s Square

The carpenter’s square isn’t a four-sided figure. It’s really a giant L, usually with a 2-inch-wide, 24-inch-long leg perpendicular to a 1-1/2-inch-wide, 16-inch-long tongue.

The most common use, as one of its nicknames suggests, is for framing, laying out and marking patterns for framing, roofing, and stairway work. It’s also useful as a straightedge for determining the flatness of surface, and for marking cutoff work on wide stock. Call it almost anything you like—including rafter square, builder’s square, or roofer’s square — but this is a tool that has lots of uses.

The calibrations on the face of a carpenter’s square will include dimensions, usually down to eighths of an inches, but sometimes on the back there’ll be tens or even twelfths of an inch for roofing layout.
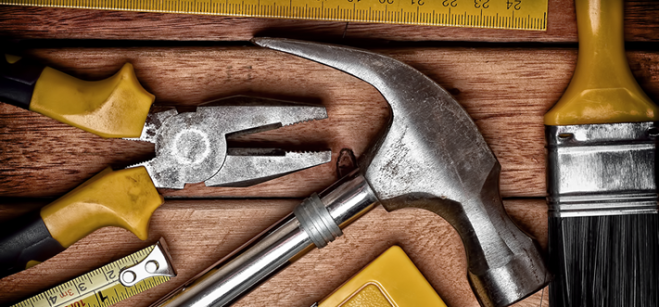
toolbox

Plumb Bob

The plumb bob or plumb line employs the laws of gravity to establish what is “plumb” (exactly vertical). You don’t need a graduate degree in physics to understand that a string suspended with a weight at the bottom will be both precisely vertical AND perpendicular to any level plane through which it passes. The plumb bob, obviously, is the companion tool to the level.

A homemade plumb can consist of most any bit of string with a weight tied its end (a couple of washers, say, or a lead sinker from a fishing line. But the factory-made plumb bob has a specially designed weight and coarse string of twisted cotton or nylon threads (masons prefer the nylon because it stands up better over time to the dampness that comes with working with water and mortar). Well-machined and well-balanced bobs have pointed tips, too, that make them more precise to use.

Handheld Circular Saw

With the possible exception of the electric drill, the Skilsaw® or circular handsaw is the power tool most often found in the average homeowner’s tool chest. It’s easy to use, affordable, and astonishingly flexible and practical.

It’s designed to cut boards to size, typically using a 7-1/4-inch-diameter blade. An electric motor, protected in a housing, drives the blade that is, in turn, protected by a fixed guard on top and retractable guard below. Add a handle, a sole plate or shoe on the bottom, and you’ve got all the parts. Plug it in and go.

One warning, though: This is no toy. It’s a powerful and efficient tool, but one that poses a real danger if not used with respect and care. Keep it well out of reach of the under-18 set.

You can take it from there. Add what you need, like chisels, a sander, and some clamps, and supplies, too, like sandpaper, nails, glue, screws, and so on. Don’t necessarily tool up all at once—that could feel expensive—but do buy tools of good quality rather than the cheap and flimsy ones on sale. Better tools last and last, and get you through many jobs, those you do both for recreation and in an emergency.

What to question your Handyman about before you hire them?

With the various projects you might have going on around the house, it may be faster to hire a handyman (or woman!) rather than spending hours on the weekends doing them all yourself. A handyman is a jack of all trades when it comes to home repairs and maintenance around your home, usually for less money than a specialist such as a plumber and electrician. But before you bring someone into your home, it’s important to find the right person. You don’t want a handyman who swindles you or fixes everything incorrectly to where you have to go back and have another professional redo the work for more money. Consider posing these questions to three or four handyman services before choosing one:

1. Are you licensed?

Many cities have processes by which handymen can become certified in their field of expertise, whether it’s as a handyman or a contractor. Ask each potential handyman if he is certified, and see a copy of that license before having one of them proceed with the work.

2. Do you have past clients as references?

If this handyman has been in their field for a while, other homeowners can vouch for the work he has done. Ask to speak to some past clients. If the person you are considering is unwilling to provide contact information, chances are he or she hasn’t done good work in the past. You can also check on the Internet for reviews.

3. Can you provide a quote ahead of time?

Handymen should be able to tell you what they’ll charge by the hour or the job. Provide them with a list of the things you’ll need done to help with this process. This will be especially useful when comparing more than one handyman service. See if you can get the estimate in writing as part of a contract.

4. Do you have liability insurance?

If the handyman is injured on the job, you don’t want to be liable for those injuries. Check to make sure they have liability insurance. Handyman services should have insurance in place to protect them in case they’re injured on the job, just as with construction workers or contractors on build sites. It protects them, and it keeps you safe from legal charges down the road.

5. Is your work guaranteed?

Ask the handyman if he guarantees his work. That is, if something is wrong, will he come back and redo it? You might have to get a guarantee in writing, but good handyman services will usually do this to show they’re serious about their work.
6. Will this be an individual or team job?

Some jobs will require the work of an individual handyman, while others might require a few people coming into your home to do the job. This is something you need to be aware of ahead of time, as it could affect price and foot traffic in your home. It’s also probably good to ask if the handyman will be on site while the team is there. Sometimes contractors will bring in workers but not be on site at all during the work, which can lead to problems.

Common Home Repairs? Do them yourself.

Your home is one of the most expensive things you’ll ever pay for, so whether you’re renting or buying, you should take good care of it. While you’ll probably be tempted to call a professional when something breaks, you can take care of a lot of problems yourself.

Most of these home repairs can be done with little to no experience. However, always be sure to do research on anything you don’t understand, particularly if you’re dealing with electricity, which can be extremely hazardous. Also, if you don’t already have a tool kit of your own, this wouldn’t be a bad time to start building your essential toolbox. Some of the repairs listed here will require special tools you may not have laying around, but we’ll list those where applicable.

Fix or Replace a Broken Toilet Lever

The handle on a toilet is an important component to any bathroom design. Not only is it integral to the function of the toilet, but the style and finish of the handle should also coordinate with the rest of the bathroom faucets and fixtures. If your toilet handle is corroded or out of date, replace it with a new one to keep your bathroom functioning in style.

A broken toilet lever is pretty easy to fix. In most cases, if pressing the lever doesn’t flush the toilet, you can just pop the tank open and re-attach the chain. However, in some cases, the handle itself can become corroded or any one of the pieces that connect the handle to the flapper (including the handle, nut, metal rod, or chain) can break. All of these parts can be replaced on the cheap, though.

Tools/materials you’ll need:

  • Adjustable wrench
  • Replacement toilet lever kit (if broken)

Procedure:

  1. Before the new handle can be installed, the old handle needs to be removed from the tank properly.
  1. Shut off the water valve to the toilet and flush the toilet to drain any water from the tank.
  1. Remove the lid from the toilet tank.
  1. Unscrew the wing nut that holds the tank lever to the back of the handle. Set it aside to be reinstalled with the new handle.
  1. Unscrew the nut from the back of the handle. Toilet nuts thread in reverse; turn the nut clockwise to remove it.
    • If the nut is plastic, use your fingers to loosen it.
    • If the nut is metal, use a wrench to help loosen it.
  1. Pull the handle through to the front of the tank and remove the nut and washer from the back of the toilet tank. Discard these parts.
  1. Unscrew the washer and nut from the back of the new handle. The washer is a rubber gasket that helps prevent leaks. It sits up against the nut and slides right off once the nut is removed.
  1. Push the new handle’s stem through the hole on the side of the toilet tank.
  1. Slide the washer over the handle’s stem and screw the nut back into place. Remember that it threads in reverse; screw it on counterclockwise to tighten it.
  1. Lift up the toilet lever and push its end down through the hole at the end of the handle’s stem.
  1. Screw on the wing nut to the end of the toilet lever to hold it in place.
  1. Turn on the water valve to refill the toilet tank.
  1. Flush the toilet to make sure the new handle works.
  1. Replace the tank lid.

Unclog a Toilet Drain

Before you call a plumber to unclog a toilet, there are two things you should try. The first is a plunger, though you’ll want to make sure you’re using the right one. Be sure you’re using the right tool for the job.

If there’s not much water in the bowl, pour enough water in to submerge the head of the plunger. Give it 8-10 good downward thrusts. Most minor clogs should clear up at this point and water should flow freely. If not, it’s auger time. Toilet augers typically cost a little more than plungers, but they can deal with tougher clogs than a simple plunger can. Run the end of the auger into the toilet until the end reaches the clog and start turning the crank. If you get a good grip on it, you should be able to pull the clog out.

Tools/materials you’ll need:

  • Toilet plunger
  • Toilet auger

Procedure:

Toilet Plunger

You can generally clear a clogged toilet with a plunger, otherwise known as the plumbers’ friend. Make sure that there’s enough water in the toilet bowl to cover the rubber suction cup, then work the handle of the plunger up and down. If there isn’t enough water in the bowl, do not flush the toilet; flushing a clogged toilet will just cause the bowl to overflow. Instead, bring a pan or pot of water from another source to supply the water you need to cover the plunger cup. There are two types of plungers, and the one with a bulb-type head is especially effective for toilets. Some types have a fold-out head that’s designed for toilet use.

Usually, whatever is blocking the toilet drain is not very far away. If the plunger’s action doesn’t dislodge the clog, you can try to hook the blockage and pull it free. A wire coat hanger can sometimes do the job, but it is really a substitute for the closet or toilet auger.

Before using the plunger, make sure there’s enough water in the toilet bowl to cover the suction cup. Pump the plunger to dislodge the clog.

Toilet Auger

The auger has a long sleeve or tube to guide the snake and auger hook into the trap. A crank on the end enables you to turn the hook in the drain or trap. Here’s how to use it.

Step 1: Insert the auger into the toilet trap and turn the crank until it feels tight. This means that the snake has twisted its way to and into the blockage.

Step 2: When you pull in the auger, you should be able to remove whatever is clogging the toilet. If you aren’t successful, try the closet auger several more times. In some cases, you may have to resort to pushing a regular plumbers’ snake through the blockage.

Step 3: When all else fails, the toilet may have to be removed from the floor and turned upside down so you can get a blockage. This is not what anyone would call an easy job, so you should give the simpler methods as good a try as you can before you remove the toilet. But removing the toilet is not beyond the capabilities of the average do-it-yourselfer, and this procedure is explained in the forthcoming section.

Fix a Leaky Kitchen/Bathroom Pipe

The most common types of pipe leaks occur under kitchen or bathroom sinks. These tend to involve either a worn out washer or a loose or broken compression nut that’s sealing it. To fix these, first you’ll need to turn the water off to the sink. Some sinks have a shut off valve right near the sink itself, but others may be as far away as the basement. You’ll have to follow the pipes depending on your house.

Once the water’s off, place a bucket underneath the pipe, and twist off the compression nuts (the big, white pieces you can unscrew). You can take this opportunity to rinse out the curved pipe (called a P-trap). Once you’ve replaced the washer (or the entire P-trap if necessary), you can screw it back in and turn the water back on.

Tools/materials you’ll need:

  • Bucket
  • Replacement P-trap or washer

Procedure:

  1. Remove the existing p-trap fitting by loosening and detaching the end connection nuts from both ends using a pipe wrench or adjustable pliers. Place a small bucket or container beneath the p-trap to catch water remaining in the fitting.
  1. Move the p-trap connection nut that remains on the sink’s vertical downpipe up slightly and slide the plastic compression ring down to remove it and the nut from the downpipe.
  1. Remove the end connections nuts and compression rings from the new p-trap fitting.
  1. Slide one of the end connection nuts from the new p-trap onto the downpipe, followed by one of the compression rings. Orient the connection nut with the threaded opening downward and the beveled edge of the compression ring toward the bottom end of the downpipe. The compression ring will slide snugly onto the downpipe and hold the connection nut in place.
  1. Slip the vertical opening of the p-trap up onto the downpipe until it stops. Thread the connection nut installed in Step 4 onto the p-trap and tighten it by hand.
  1. Slide the remaining end connection nut from the new p-trap onto the drain pipe from the wall, followed by the remaining compression ring. Orient the connection nut with the threaded opening toward the p-trap and the beveled edge of the compression ring toward the open end of the drain pipe.
  1. Align the other end of the p-trap fitting with the drain line from the wall and tighten the connection nut onto the end by hand.
  1. Tighten both of the end connection nuts using a pipe wrench or adjustable pliers to complete the p-trap repair.

Replace a Light Switch

Most electrical work in your home should probably be done by a professional if, for no other reason, than the risk of serious injury or death is much higher when dealing with electricity than a toilet or drywall. However, light switches are among the easiest to replace. If you have a switch that’s not working properly, you can do it pretty simply. Be sure to turn off the circuit breaker before beginning. Electricity can be dangerous, so take all the necessary precautions.

You can use a flathead screwdriver to remove the faceplate covering the switch. Then use a phillips head screwdriver to remove the switch from the wall. You’ll see two wires connected to screws on the switch. You’ll want to test the wires to ensure there’s no electricity running through them. Disconnect the wires and attach them to the new switch, and you’re ready to put everything back together.

Tools/materials you’ll need:

  • Flathead screwdriver
  • Phillips head screwdriver
  • Replacement light switch

Procedure:

If a light switch fails to function, it should be replaced. Most modern switches have screw terminals on each side and may also have holes in the back to accept the end of the wire. Although plug-in connections may be more convenient, they are less reliable than those with screw terminals, so don’t use them!

You can easily loosen the screws on the side of the device with a standard screwdriver (turning counterclockwise), but you may find getting the wires out of the back of the device tricky. To remove these wires, insert the blade of a small screwdriver into the slot under the hole into which the wire is inserted and push in as you pull the wire loose. Pushing the blade of the screwdriver into the slot releases the grip on the inserted wire. Here are descriptions of the wires and where they go:

  • The white (neutral) wire connects to the silver screw, or you place it in the back wire hole on the same side of the device as the silver screw.
  • The black (hot) wire goes to the brass screw or into the hole in the back of the device on the same side as the brass screw. This wire is sometimes red.
  • The green or bare copper (ground) wire, if the device has one, attaches to the green screw terminal on the switch or to the electrical box.

If the switch has On and Off embossed on its body and it’s the only switch that controls lights or receptacles, it’s a single-pole switch. To replace this kind of switch, follow these steps:

  1. Turn off the power to the switch at the main circuit breaker or fuse panel.
  2. Unscrew and remove the switch plate; then use a voltage tester to make sure that the circuit is dead.
  3. Unscrew the switch from the electrical box and pull it out with the wires still attached.

Two or three wires will be attached to the switch: an incoming hot wire, which is black; a return wire, which carries the load to the fixture and may be black, red, or any other colour except green; and sometimes a grounding wire, which is green or bare copper. There may be other wires in the box, but you are only dealing with the ones connected directly to the switch.

You may find a white wire that has black tape on it connected to the switch. This tape indicates that the white wire is being used as a black or collared wire in the switch leg, so it’s not neutral.

  1. Compare your new switch with the one you’re replacing to find the corresponding locations for the electrical screw connectors.

Because the power is off, you can match up the connectors the easy way: Instead of disconnecting all the wires at once and possibly getting confused, unscrew and connect one wire at a time.

2. Attach the first wire you unscrew to the same-colored screw on the new switch as it was on the old; do the same with the second.

To connect a wire to a terminal, strip off about 1/2 inch of insulation, using a wire stripper, and twist the end into a clockwise loop with long-nose pliers. The loop must wrap at least two-thirds but no more than three-quarters of the way around the terminal screw. Hook the wire clockwise around the screw so when you tighten the screw with a screwdriver, the clockwise force of the tightening screw makes the loop wrap tighter around the screw.

3. Gently push the new, wired switch back into the electrical box and screw it in place.

4. Screw on the switch plate and turn on the power.

Loosen Up a Stuck Window

If you go too long without opening a window, it can get so mucked up with dirt and crap that it’s difficult to open it. This isn’t a terribly complex problem to solve, but it can require some elbow grease (or a more proper lubricating agent like WD-40). The video above shows you how to pry the window sash away from the frame with a pizza cutter, though if you’re concerned with preserving the paint, you can use a somewhat less sharp putty knife to wiggle the edges open. Once you’ve got the window moving again, be sure to clean it thoroughly.

Tools/materials you’ll need:

  • Putty knife/pizza cutter
  • WD-40 or other lubricant
  • Cleaning supplies
  • Rag

Of course, there’s no shortage of things in your house that can break, but you’ll find that a good deal of things can be fixed with just a little bit of Google-fu and a few bucks worth of supplies from a hardware store. Some things should obviously be taken care of by a professional, particularly where safety’s concerned, but if something’s broken at your home and it’s not on this list, check online before you call the repairman. It could save you a bundle.

References;

A DIY : 6 Home Repairs

Want to fix a pesky problem in your kitchen or bathroom without breaking the bank? Tackle those small home repairs all by yourself.

All you have to do is follow the steps and voila! There you are!

& if you can’t, then you always have Prudent Handymen Services (London, UK) to fall back on….

  • Broken Tile

Remove the grout around the tile with aBroken-Loose-Tile grout saw, a small tool available for a few dollars at paint and hardware stores. If a tile has already started to chip, continue to break off little pieces and remove the entire damaged tile.

If not, make a hole in the centre with a masonry drill, which will break the tile, and remove the pieces from the centre outward. Glue the new tile in place with an adhesive such as Liquid Nails, and then apply fresh grout around the edges.

  • Torn Vinyl

Use a silicone-base seam sealer to fill linoleum-floor-tearthe tear and wipe off the excess with a dry cloth. Or try this easy fix: If it’s a no-wax floor and the tear is small, take a bar of soap and rub it sideways along the cut until it is filled.

You’d think the soap would disappear when you wash the floor, but unless you immerse the vinyl in water and use a brush, the soap will stay in place. It won’t be as good as new, but it will go a long way to hide the problem.

traditional-wood-kitchen-cabinets-interior-design-with-checkered-backsplash-and-dull-pendant-lamp

  • Scratches in a Wood Cabinet

Hardware stores sell a number of scratch fillers that look like brown pencils or crayons. Find the shade that most closely matches your cabinet and rub it into the scratch. Or you can try a similar product that is more like a felt-tip pen and comes in different shades of ink.

  • How to Paint a RoomHow-To-Paint-A-Room-as-great-innovation-painting-idea-of-Interior-at-stiventures.com-10

Painting is one of the easiest ways to update and add to your kitchen or bathroom. Learn how to paint a room, courtesy of Benjamin Moore.

The idea of painting a room can sometimes be intimidating, but with these 5 easy steps, you’ll see how simple it is to get great results.

The correct sequence of steps is the key to giving any room a quick and refreshing paint makeover. Tip: Start with the ceiling first and then paint the walls.

Step 1 — Clean Ceiling and Walls

Remove dust, dirt, and grease spots (which can ruin a smooth finish) with water, a little mild dishwashing detergent, and a cellulose sponge. Rinse ceiling and walls with clean water to remove the soap residue.

Step 2 — Cut in Around EdgesRoom-shot-1

Beginning at the corner of the room, use a two-inch or 2.5-inch trim brush to “cut in,” applying a three-inch strip of coating along the perimeter where the wall and the ceiling meet.

Cut in a section at a time, alternating between cutting in and painting the ceiling to maintain a wet edge and prevent a visible line between the cut-in area and the rest of the ceiling.

Step 3 — Rolling the Ceiling

Before you begin painting the ceiling, remove excess paint on the roller by slowly rolling it back and forth over the ridges of the paint tray.

Start painting near the corner of the room, blending the coating into the ceiling line painted previously. Paint across the width of the ceiling, rather than the length, and make sure to roll in a motion across your body, rather than along your body, to avoid straining your neck and back.

Step 4 — Painting the Walls

Once your ceiling is dry, return to the spot where you began painting. Use a trim brush to carefully cut in along the wall-ceiling line. Extend out two to three inches from windows, doors, and moldings. Once you’ve cut in around an entire wall area, use a roller to fill in the field.

For efficiency, start in the corner of a wall and roll on a three-by-three-foot W pattern, then fill it in without lifting the roller. Continue in sections until you’re finished. Paint one wall at a time.

Step 5 — Painting the Trim

Once the walls are completely dry, place painter’s blue tape where the trim meets the wall. Paint the moldings, baseboard and the door and window frames with a two-inch angled brush. When painting your trim, paint the tops of the doors and windows first and work your way down so that you can remove any runs as you go. Paint your baseboards last.

  • Frozen Icemaker

Inside the freezer, remove the ice bin and find the tray where the water freezes into ice cubes. Open the tray and look for a little piece of plastic pipe where the water flows into the ice-cube tray. The end of that pipe can freeze up. You can thaw it out by aiming a hair dryer at the pipe. It should thaw within five minutes.

  • Loose Laminate Countertopsimages

Buy an adhesive such as Liquid Nails — the kind that says “projects” on the label — and apply it beneath the laminate. Press the laminate down and put something heavy on top until it dries. Liquid Nails and similar products are available at hardware and lumber stores.applying-caulk-with-gun

  • Worn-Out or Dried Caulk

Put some adhesive remover (3M makes a particularly good one) on a damp cloth or sponge and wipe over the silicone caulk. Let it soak in. Remove the old caulk and clean the area with a ceramic tile cleaner. Let it dry, then recaulk.

  • Stains in Grout

If grout is stained with mold or mildew, tile cleaners such as Tilex can kill it. Be tile-3-b-asure to soak the stain well with the tile cleaner and let it sit for at least a couple of days. Mold and mildew need time to die, and when they do, they turn white. If the stain is from wine, remove the affected grout with a grout saw, then regrout. About 48 hours later, use a grout sealer to reduce the likelihood that the grout will stain again.

  • Drippy Faucet

First, stop the flow of water to the faucet drippy-faucetby turning off the stop valves under the sink. If it’s an old faucet, remove the handle by unscrewing it. (The screw may be hidden under a plastic piece that you can flip off with a pocketknife.) Once the handle is off, remove the chrome cylinder underneath, then remove the nut that holds the stem in place. Pull out the stem and replace the washer. New faucets have “seats” that serve the same purpose as a washer, but you need to buy one that’s specifically for the brand and model of your faucet. Disassemble the faucet and take it to a hardware or plumbing store if you need help identifying the model.

So there you have it folks. We hope that you’d be able to tackle all that all on your own but if you can’t, you know who to call.

Your favourite Handymen at Prudent Handymen Services are here for you!

Have a knack for fixing things?

Have a knack for fixing things and are looking for a business idea to get into… let us help you! http://ow.ly/SYDD0

Need to make a profit at your handyman business?

Need to make a profit at your handyman business? Read on and find out!
http://ow.ly/SYDBK

Need to get wiring fixed & Shelves set up?

Need to get wiring fixed & Shelves set up?
Who to call… Handyman or Plumber?

Let us answer that forever there question for you.
https://goo.gl/NeHesx

Tired of the Usual? Have a taste of the Unusual Handyman Service for a Change…!

Bored & Tired of the Usual?
Have a taste of the Unusal & Unique with Prudent Handymen Services!
http://ow.ly/SYDzi

Tips to say goodbye to your Handyman Related Worries…

Have you hired a handyman by the hour and are now worried about the dent it is going to make in your budget? No need to worry!

Follow the Link and say goodbye to all your worries! http://ow.ly/SYDFp